Mobile Detail Center

Tag: Odor & Moisture

  • How to Clean Vomit From a Car Seat and Remove the Odor

    How to Clean Vomit From a Car Seat and Remove the Odor

    Menu

    ODOR & REMEDIATION

    How to Clean Vomit From a Car Seat and Remove the Odor

    How to clean vomit from car seat. Learn the process, timing, local conditions, common mistakes, and when professional help makes sense in this practical guide.

    Serving every city and neighborhood in Orange County, California.
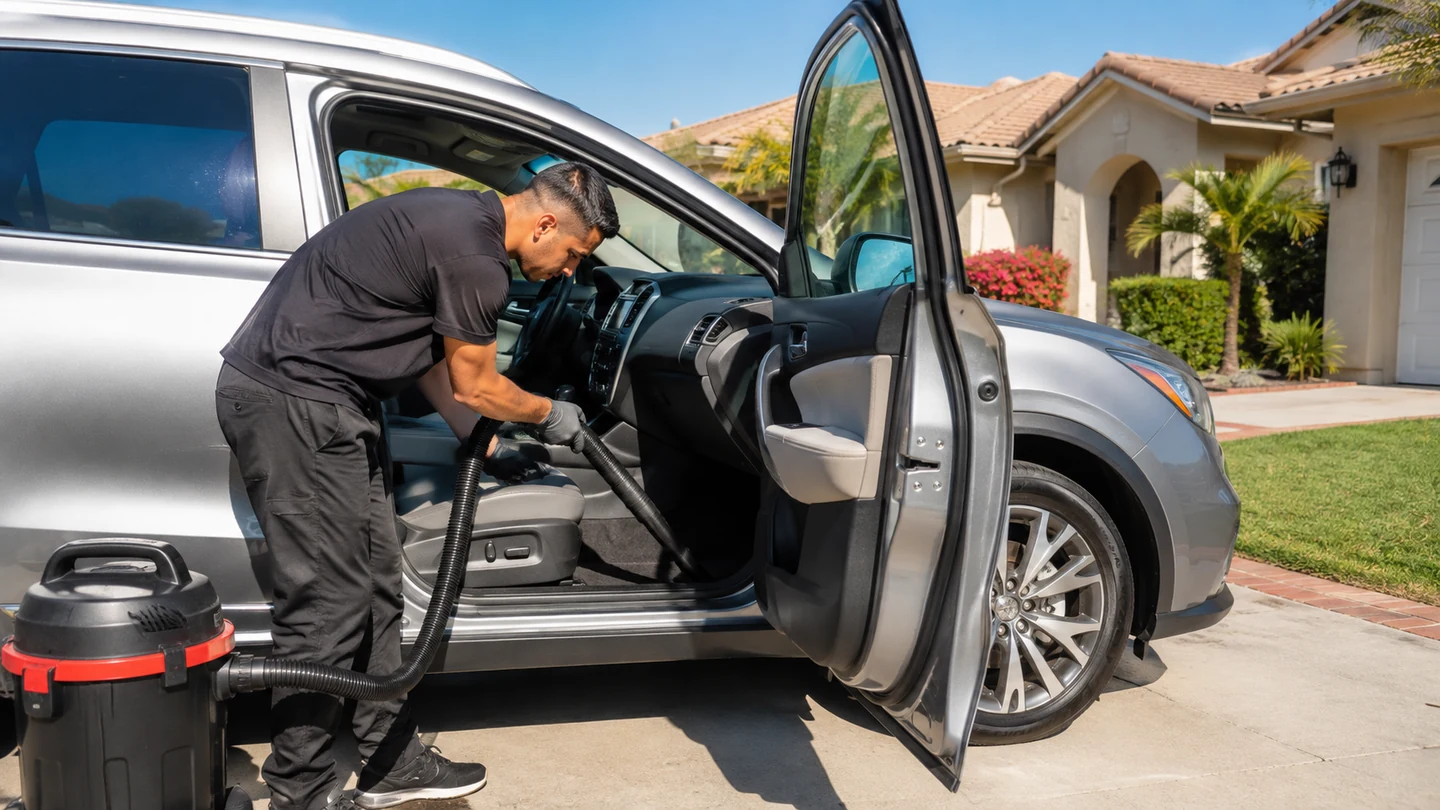
    Mobile detailing service in Orange County for how to clean vomit from car seat

    By Blog Writer · approximately 14 minute read · Updated September 2026 · Topic: how to clean vomit from car seat

    Quick answer: how to clean vomit from car seat

    Act promptly, ventilate, wear disposable gloves, remove solids without spreading them, blot liquid, and use a cleaner appropriate for the seat material. Fabric may need controlled extraction. Dry the cushion fully and reevaluate; contamination inside foam or mechanisms can require removal or replacement.

    Interior materials can look similar while reacting very differently to moisture, heat, agitation, and chemistry. Identify the material and test a concealed area before treating the visible stain. For how to clean vomit from car seat, the purpose of this guide is to help you ask better questions, choose a suitable scope, and know what to inspect before accepting the result. It cannot replace the care instructions for your exact vehicle, finish, upholstery, accessory, or cleaning product.

    When people search for how to clean vomit from car seat, they often want a single number or shortcut. The responsible answer is a repeatable process: identify the surface and condition, control the work area, use compatible tools and chemistry, remove residue, allow required drying or curing, and inspect again. That process protects the vehicle and gives the customer a clearer handoff.

    What changes the right answer

    The following variables determine whether common how to clean vomit from car seat advice is appropriate. Review them together for “How to Clean Vomit From a Car Seat and Remove the Odor”; one factor can change the method even when the rest of the vehicle looks ordinary.

    Cloth, leather, vinyl, or child-seat material

    Cloth, leather, vinyl, or child-seat material. Treat this as a decision point, not a box to check. Record what you observe, compare it with the vehicle or product instructions, and choose the least aggressive suitable response. That discipline keeps how to clean vomit from car seat guidance tied to the actual vehicle instead of a generic promise. Interior materials can look similar while reacting very differently to moisture, heat, agitation, and chemistry. Identify the material and test a concealed area before treating the visible stain.

    Amount and depth

    Amount and depth. Look at this factor before tools or chemicals touch the surface. It changes the labor, the safe method, and the result that can reasonably be approved. If the condition is uncertain, pause for a concealed-area test or a professional inspection rather than increasing force.

    Time before cleanup

    Time before cleanup. This detail is easy to overlook, yet it often explains why two similar-looking vehicles need different plans. Confirm it in useful light, keep notes or photos when appropriate, and make the customer or technician aware of any limitation before the work proceeds.

    Perforations, seams, and mechanisms

    Perforations, seams, and mechanisms. The practical test is whether the chosen method removes the unwanted material without changing the surface underneath. Work in a small controlled area, inspect the towel or tool, and stop when the finish reacts differently than expected.

    Prior cleaning attempts

    Prior cleaning attempts. Build enough time for this into the appointment. Rushing tends to move contamination, leave residue, or skip drying and inspection. A clear sequence makes the result easier to verify at customer handoff and easier to maintain afterward.

    Ability to remove and dry residue

    Ability to remove and dry residue. Consider both the visible surface and what sits below or behind it. Moisture, foam, seams, coatings, electronics, and prior repairs may not be obvious. Material identification is part of good how to clean vomit from car seat work, not an optional extra.

    Decision factors for how to clean vomit from car seat
    Use condition and material—not guesswork—to choose the scope.

    A practical step-by-step plan

    This sequence keeps how to clean vomit from car seat work observable and reversible for as long as possible. Product labels and the vehicle owner’s manual take priority whenever they set a narrower limit.

    Step 1: Ventilate and use gloves

    Ventilate and use gloves. This detail is easy to overlook, yet it often explains why two similar-looking vehicles need different plans. Confirm it in useful light, keep notes or photos when appropriate, and make the customer or technician aware of any limitation before the work proceeds.

    Step 2: Lift solids into a disposable bag

    Lift solids into a disposable bag. The practical test is whether the chosen method removes the unwanted material without changing the surface underneath. Work in a small controlled area, inspect the towel or tool, and stop when the finish reacts differently than expected.

    Step 3: Blot without spreading

    Blot without spreading. Build enough time for this into the appointment. Rushing tends to move contamination, leave residue, or skip drying and inspection. A clear sequence makes the result easier to verify at customer handoff and easier to maintain afterward.

    Step 4: Check the seat-care instructions

    Check the seat-care instructions. Consider both the visible surface and what sits below or behind it. Moisture, foam, seams, coatings, electronics, and prior repairs may not be obvious. Material identification is part of good how to clean vomit from car seat work, not an optional extra.

    Step 5: Clean and extract compatible material

    Clean and extract compatible material. Use the same standard on every section: inspect, test, perform the minimum effective action, remove residue, then evaluate again. That makes the process repeatable without pretending every panel, seat, lens, or vehicle is identical.

    Step 6: Address seams and adjacent carpet

    Address seams and adjacent carpet. Treat this as a decision point, not a box to check. Record what you observe, compare it with the vehicle or product instructions, and choose the least aggressive suitable response. That discipline keeps how to clean vomit from car seat guidance tied to the actual vehicle instead of a generic promise.

    Step 7: Dry completely and inspect

    Dry completely and inspect. Look at this factor before tools or chemicals touch the surface. It changes the labor, the safe method, and the result that can reasonably be approved. If the condition is uncertain, pause for a concealed-area test or a professional inspection rather than increasing force.

    Step-by-step process for how to clean vomit from car seat
    A controlled sequence makes the final inspection more meaningful.

    Timing, cost, and realistic expectations

    Time and price for how to clean vomit from car seat follow scope. A lightly affected, accessible area may need a short maintenance step; an older vehicle with embedded soil, prior product residue, multiple materials, or damage needs more inspection and labor. A quote should state the selected service, vehicle class, add-ons, and agreed final amount. Duration is useful for planning the detailer’s work and the customer’s handoff, but it should not be used to rush a careful process.

    Some how to clean vomit from car seat results can be judged immediately, such as loose debris removal or a clean exterior panel. Upholstery, carpet, coatings, and odor work may need drying or cure time before the final condition is clear. Permanent dye change, coating failure, cracks, corrosion, burned paint, worn fabric, and contamination deep inside foam are not the same as removable soil. A reputable service distinguishes improvement from repair and does not guarantee an outcome before inspection.

    For “How to Clean Vomit From a Car Seat and Remove the Odor,” ask what is included, what is excluded, how a condition-based add-on is approved, and what happens if the technician finds damage or a material that cannot be treated safely. MDC’s booking form displays the configured service prices and selectable extras. Operations confirms the appointment and final scope so the customer and detailer share the same record.

    Orange County conditions to consider

    Warm cabin temperatures make odor and bacterial growth more difficult to manage. Keep the vehicle out of direct sun while residue is present, then use safe ventilation during drying.

    Mobile how to clean vomit from car seat work also depends on the service location. The vehicle needs a safe, lawful, accessible area with permission from the property owner or manager when required. Water, power, shade, traffic, gates, parking rules, and runoff control may affect whether the planned process can be completed there. A good booking request describes those conditions instead of leaving the technician to discover them at arrival.

    Weather can change during a “How to Clean Vomit From a Car Seat and Remove the Odor” appointment. Hot panels shorten product dwell time, wind moves dust across clean surfaces, coastal humidity slows fabric drying, and unexpected rain can make exterior work unsuitable. Rescheduling or adjusting a scope protects the result; it is not a reason to skip preparation, documentation, or customer approval.

    Common mistakes to avoid

    Most avoidable damage comes from excessive force, incompatible chemistry, cross-contaminated tools, uncontrolled moisture, or a rushed handoff. Watch for these specific errors when planning how to clean vomit from car seat.

    Rubbing the contamination deeper

    Rubbing the contamination deeper. Build enough time for this into the appointment. Rushing tends to move contamination, leave residue, or skip drying and inspection. A clear sequence makes the result easier to verify at customer handoff and easier to maintain afterward.

    Mixing cleaners

    Mixing cleaners. Consider both the visible surface and what sits below or behind it. Moisture, foam, seams, coatings, electronics, and prior repairs may not be obvious. Material identification is part of good how to clean vomit from car seat work, not an optional extra.

    Masking odor with fragrance

    Masking odor with fragrance. Use the same standard on every section: inspect, test, perform the minimum effective action, remove residue, then evaluate again. That makes the process repeatable without pretending every panel, seat, lens, or vehicle is identical.

    Soaking electrical seat components

    Soaking electrical seat components. Treat this as a decision point, not a box to check. Record what you observe, compare it with the vehicle or product instructions, and choose the least aggressive suitable response. That discipline keeps how to clean vomit from car seat guidance tied to the actual vehicle instead of a generic promise.

    Reinstalling a child seat before following its manual

    Reinstalling a child seat before following its manual. Look at this factor before tools or chemicals touch the surface. It changes the labor, the safe method, and the result that can reasonably be approved. If the condition is uncertain, pause for a concealed-area test or a professional inspection rather than increasing force.

    When professional help makes sense

    Professional help with how to clean vomit from car seat is useful when the vehicle has several materials, limited access, embedded contamination, uncertain prior repairs, or a result that needs documented inspection. A technician can also identify when the condition belongs with a body shop, upholstery repairer, glass specialist, electrician, mold remediator, hazardous-spill service, or another qualified trade. Saying that a surface should not be treated is sometimes the safest professional conclusion.

    MDC offers mobile service throughout Orange County for requests such as “How to Clean Vomit From a Car Seat and Remove the Odor.” Review the Interior Detailing page for the closest service match, browse the Orange County service area, or use the online booking form to choose a vehicle and see currently configured options. The submitted request is reviewed before the appointment is confirmed.

    Frequently asked questions

    Can I use household disinfectant?

    Only when the vehicle or child-seat maker approves it for that exact material. Some disinfectants damage coatings, foam, straps, or sensors. For how to clean vomit from car seat, use that answer as a starting point and verify the actual vehicle, material, and approved service scope.

    Why does the smell return?

    Residue may remain in foam, seams, carpet, or ventilation, and warmth releases it again. For how to clean vomit from car seat, use that answer as a starting point and verify the actual vehicle, material, and approved service scope.

    Can a seat be extracted more than once?

    Repeated controlled passes may be needed, but over-wetting creates a second moisture problem. For how to clean vomit from car seat, use that answer as a starting point and verify the actual vehicle, material, and approved service scope.

    What about a child safety seat?

    Follow the child-seat manufacturer's manual exactly; harnesses and foam often have strict cleaning limits. For how to clean vomit from car seat, use that answer as a starting point and verify the actual vehicle, material, and approved service scope.

    Suggested reading

    These related MDC guides explain decisions adjacent to how to clean vomit from car seat and use the same inspect-first approach:

    Sources and care directions

    Sources for this how to clean vomit from car seat guide were reviewed September 12, 2026. External material is provided for context; product labels, current manufacturer instructions, and the manual for the exact vehicle control the work.

    Request prompt interior service and describe the affected material and area so the correct cleanup limits are clear.

    For how to clean vomit from car seat, tell us the vehicle, condition, service location, and result you want. We will review the request, confirm the scope and agreed final price, and send appointment updates as the job moves forward.
  • How to Remove Mold From a Car Interior Safely

    How to Remove Mold From a Car Interior Safely

    Menu

    ODOR & REMEDIATION

    How to Remove Mold From a Car Interior Safely

    How to remove mold from car interior. Learn the process, timing, local conditions, common mistakes, and when professional help makes sense in this practical.

    Serving every city and neighborhood in Orange County, California.

    Mobile detailing service in Orange County for how to remove mold from car interior

    By Blog Writer · approximately 14 minute read · Updated September 2026 · Topic: how to remove mold from car interior

    Quick answer: how to remove mold from car interior

    Mold requires more than a cosmetic wipe. Stop the leak or moisture source, limit occupant exposure, assess how far growth extends, use appropriate personal protection, remove material that cannot be safely cleaned, and dry the vehicle thoroughly. Significant growth or health risk calls for qualified remediation.

    Interior materials can look similar while reacting very differently to moisture, heat, agitation, and chemistry. Identify the material and test a concealed area before treating the visible stain. For how to remove mold from car interior, the purpose of this guide is to help you ask better questions, choose a suitable scope, and know what to inspect before accepting the result. It cannot replace the care instructions for your exact vehicle, finish, upholstery, accessory, or cleaning product.

    When people search for how to remove mold from car interior, they often want a single number or shortcut. The responsible answer is a repeatable process: identify the surface and condition, control the work area, use compatible tools and chemistry, remove residue, allow required drying or curing, and inspect again. That process protects the vehicle and gives the customer a clearer handoff.

    What changes the right answer

    The following variables determine whether common how to remove mold from car interior advice is appropriate. Review them together for “How to Remove Mold From a Car Interior Safely”; one factor can change the method even when the rest of the vehicle looks ordinary.

    Size and location of visible growth

    Size and location of visible growth. Treat this as a decision point, not a box to check. Record what you observe, compare it with the vehicle or product instructions, and choose the least aggressive suitable response. That discipline keeps how to remove mold from car interior guidance tied to the actual vehicle instead of a generic promise. Interior materials can look similar while reacting very differently to moisture, heat, agitation, and chemistry. Identify the material and test a concealed area before treating the visible stain.

    Musty odor beyond the visible area

    Musty odor beyond the visible area. Look at this factor before tools or chemicals touch the surface. It changes the labor, the safe method, and the result that can reasonably be approved. If the condition is uncertain, pause for a concealed-area test or a professional inspection rather than increasing force.

    Water source and duration

    Water source and duration. This detail is easy to overlook, yet it often explains why two similar-looking vehicles need different plans. Confirm it in useful light, keep notes or photos when appropriate, and make the customer or technician aware of any limitation before the work proceeds.

    Porous foam, carpet, and insulation

    Porous foam, carpet, and insulation. The practical test is whether the chosen method removes the unwanted material without changing the surface underneath. Work in a small controlled area, inspect the towel or tool, and stop when the finish reacts differently than expected.

    Occupant health risks

    Occupant health risks. Build enough time for this into the appointment. Rushing tends to move contamination, leave residue, or skip drying and inspection. A clear sequence makes the result easier to verify at customer handoff and easier to maintain afterward.

    Ability to contain and dry the work

    Ability to contain and dry the work. Consider both the visible surface and what sits below or behind it. Moisture, foam, seams, coatings, electronics, and prior repairs may not be obvious. Material identification is part of good how to remove mold from car interior work, not an optional extra.

    Decision factors for how to remove mold from car interior
    Use condition and material—not guesswork—to choose the scope.

    A practical step-by-step plan

    This sequence keeps how to remove mold from car interior work observable and reversible for as long as possible. Product labels and the vehicle owner’s manual take priority whenever they set a narrower limit.

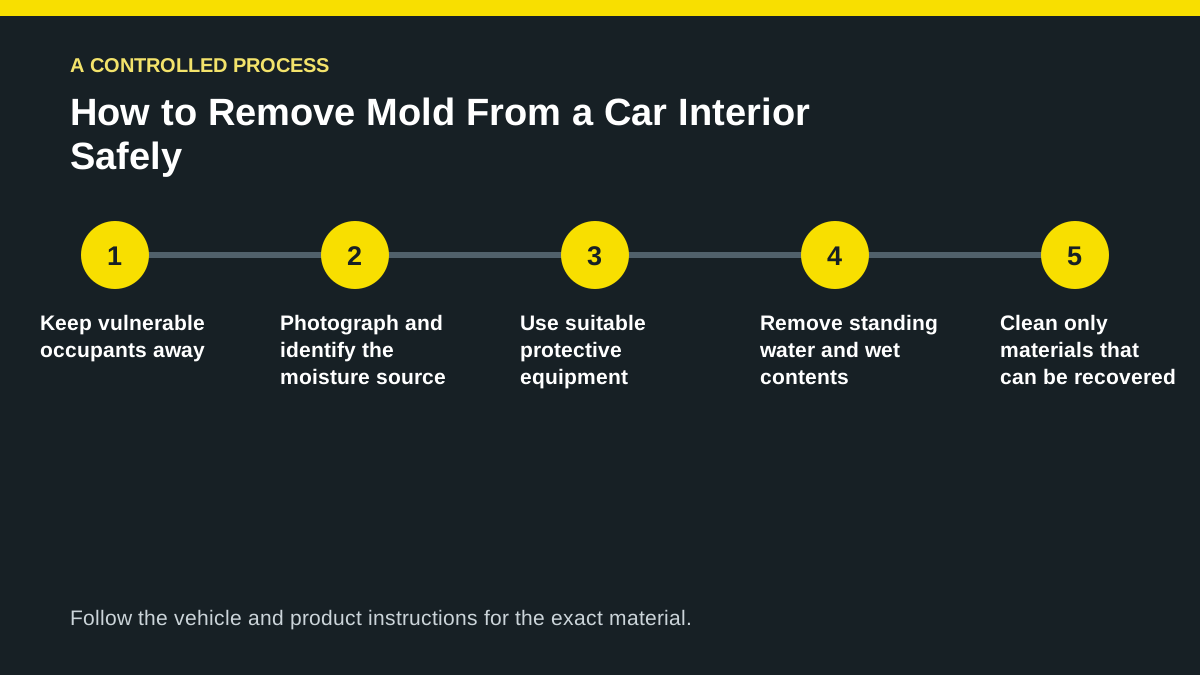
    Step 1: Keep vulnerable occupants away

    Keep vulnerable occupants away. This detail is easy to overlook, yet it often explains why two similar-looking vehicles need different plans. Confirm it in useful light, keep notes or photos when appropriate, and make the customer or technician aware of any limitation before the work proceeds.

    Step 2: Photograph and identify the moisture source

    Photograph and identify the moisture source. The practical test is whether the chosen method removes the unwanted material without changing the surface underneath. Work in a small controlled area, inspect the towel or tool, and stop when the finish reacts differently than expected.

    Step 3: Use suitable protective equipment

    Use suitable protective equipment. Build enough time for this into the appointment. Rushing tends to move contamination, leave residue, or skip drying and inspection. A clear sequence makes the result easier to verify at customer handoff and easier to maintain afterward.

    Step 4: Remove standing water and wet contents

    Remove standing water and wet contents. Consider both the visible surface and what sits below or behind it. Moisture, foam, seams, coatings, electronics, and prior repairs may not be obvious. Material identification is part of good how to remove mold from car interior work, not an optional extra.

    Step 5: Clean only materials that can be recovered

    Clean only materials that can be recovered. Use the same standard on every section: inspect, test, perform the minimum effective action, remove residue, then evaluate again. That makes the process repeatable without pretending every panel, seat, lens, or vehicle is identical.

    Step 6: Dry hidden layers completely

    Dry hidden layers completely. Treat this as a decision point, not a box to check. Record what you observe, compare it with the vehicle or product instructions, and choose the least aggressive suitable response. That discipline keeps how to remove mold from car interior guidance tied to the actual vehicle instead of a generic promise.

    Step 7: Reinspect before normal use

    Reinspect before normal use. Look at this factor before tools or chemicals touch the surface. It changes the labor, the safe method, and the result that can reasonably be approved. If the condition is uncertain, pause for a concealed-area test or a professional inspection rather than increasing force.

    Step-by-step process for how to remove mold from car interior
    A controlled sequence makes the final inspection more meaningful.

    Timing, cost, and realistic expectations

    Time and price for how to remove mold from car interior follow scope. A lightly affected, accessible area may need a short maintenance step; an older vehicle with embedded soil, prior product residue, multiple materials, or damage needs more inspection and labor. A quote should state the selected service, vehicle class, add-ons, and agreed final amount. Duration is useful for planning the detailer’s work and the customer’s handoff, but it should not be used to rush a careful process.

    Some how to remove mold from car interior results can be judged immediately, such as loose debris removal or a clean exterior panel. Upholstery, carpet, coatings, and odor work may need drying or cure time before the final condition is clear. Permanent dye change, coating failure, cracks, corrosion, burned paint, worn fabric, and contamination deep inside foam are not the same as removable soil. A reputable service distinguishes improvement from repair and does not guarantee an outcome before inspection.

    For “How to Remove Mold From a Car Interior Safely,” ask what is included, what is excluded, how a condition-based add-on is approved, and what happens if the technician finds damage or a material that cannot be treated safely. MDC’s booking form displays the configured service prices and selectable extras. Operations confirms the appointment and final scope so the customer and detailer share the same record.

    Orange County conditions to consider

    A warm closed cabin after rain, a leaking sunroof drain, wet carpet, or a flooded trunk can support growth. Orange County heat can hide moisture under carpet even while the visible surface feels dry.

    Mobile how to remove mold from car interior work also depends on the service location. The vehicle needs a safe, lawful, accessible area with permission from the property owner or manager when required. Water, power, shade, traffic, gates, parking rules, and runoff control may affect whether the planned process can be completed there. A good booking request describes those conditions instead of leaving the technician to discover them at arrival.

    Weather can change during a “How to Remove Mold From a Car Interior Safely” appointment. Hot panels shorten product dwell time, wind moves dust across clean surfaces, coastal humidity slows fabric drying, and unexpected rain can make exterior work unsuitable. Rescheduling or adjusting a scope protects the result; it is not a reason to skip preparation, documentation, or customer approval.

    Common mistakes to avoid

    Most avoidable damage comes from excessive force, incompatible chemistry, cross-contaminated tools, uncontrolled moisture, or a rushed handoff. Watch for these specific errors when planning how to remove mold from car interior.

    Mixing bleach with other cleaners

    Mixing bleach with other cleaners. Build enough time for this into the appointment. Rushing tends to move contamination, leave residue, or skip drying and inspection. A clear sequence makes the result easier to verify at customer handoff and easier to maintain afterward.

    Blowing spores through the cabin

    Blowing spores through the cabin. Consider both the visible surface and what sits below or behind it. Moisture, foam, seams, coatings, electronics, and prior repairs may not be obvious. Material identification is part of good how to remove mold from car interior work, not an optional extra.

    Cleaning the surface without fixing the leak

    Cleaning the surface without fixing the leak. Use the same standard on every section: inspect, test, perform the minimum effective action, remove residue, then evaluate again. That makes the process repeatable without pretending every panel, seat, lens, or vehicle is identical.

    Soaking electronics

    Soaking electronics. Treat this as a decision point, not a box to check. Record what you observe, compare it with the vehicle or product instructions, and choose the least aggressive suitable response. That discipline keeps how to remove mold from car interior guidance tied to the actual vehicle instead of a generic promise.

    Promising that odor means the mold is gone

    Promising that odor means the mold is gone. Look at this factor before tools or chemicals touch the surface. It changes the labor, the safe method, and the result that can reasonably be approved. If the condition is uncertain, pause for a concealed-area test or a professional inspection rather than increasing force.

    When professional help makes sense

    Professional help with how to remove mold from car interior is useful when the vehicle has several materials, limited access, embedded contamination, uncertain prior repairs, or a result that needs documented inspection. A technician can also identify when the condition belongs with a body shop, upholstery repairer, glass specialist, electrician, mold remediator, hazardous-spill service, or another qualified trade. Saying that a surface should not be treated is sometimes the safest professional conclusion.

    MDC offers mobile service throughout Orange County for requests such as “How to Remove Mold From a Car Interior Safely.” Review the Interior Detailing page for the closest service match, browse the Orange County service area, or use the online booking form to choose a vehicle and see currently configured options. The submitted request is reviewed before the appointment is confirmed.

    Frequently asked questions

    Can I drive a moldy car?

    Avoid exposure until the extent and occupant risks are understood, especially for people with asthma, allergies, lung disease, or immune suppression. For how to remove mold from car interior, use that answer as a starting point and verify the actual vehicle, material, and approved service scope.

    Will detailing remove all mold?

    A detail can address limited cleanable contamination, but widespread growth, flooded padding, HVAC involvement, or health risk may require specialist remediation. For how to remove mold from car interior, use that answer as a starting point and verify the actual vehicle, material, and approved service scope.

    Should I use bleach?

    Do not improvise chemical mixtures. Vehicle materials and confined spaces create risks; follow authoritative safety and material guidance. For how to remove mold from car interior, use that answer as a starting point and verify the actual vehicle, material, and approved service scope.

    Why does mold come back?

    Remaining moisture, hidden contaminated porous material, or an unresolved leak can restart growth. For how to remove mold from car interior, use that answer as a starting point and verify the actual vehicle, material, and approved service scope.

    Suggested reading

    These related MDC guides explain decisions adjacent to how to remove mold from car interior and use the same inspect-first approach:

    Sources and care directions

    Sources for this how to remove mold from car interior guide were reviewed September 12, 2026. External material is provided for context; product labels, current manufacturer instructions, and the manual for the exact vehicle control the work.

    Contact MDC for an initial condition review; if the scope exceeds safe detailing, use a qualified mold-remediation or vehicle-repair specialist.

    For how to remove mold from car interior, tell us the vehicle, condition, service location, and result you want. We will review the request, confirm the scope and agreed final price, and send appointment updates as the job moves forward.
  • How to Remove Smoke Smell From a Car Interior

    How to Remove Smoke Smell From a Car Interior

    Menu

    ODOR & REMEDIATION

    How to Remove Smoke Smell From a Car Interior

    Remove smoke smell from car. Learn the process, timing, local conditions, common mistakes, and when professional help makes sense in this practical guide.

    Serving every city and neighborhood in Orange County, California.

    Mobile detailing service in Orange County for remove smoke smell from car

    By Blog Writer · approximately 14 minute read · Updated September 2026 · Topic: remove smoke smell from car

    Quick answer: remove smoke smell from car

    Smoke odor is attached residue, not just air. Remove ash and debris, clean hard surfaces and glass, treat compatible fabrics and carpet, inspect the headliner, replace the cabin filter when appropriate, and evaluate the ventilation system. Fragrance alone only covers the source temporarily.

    Interior materials can look similar while reacting very differently to moisture, heat, agitation, and chemistry. Identify the material and test a concealed area before treating the visible stain. For remove smoke smell from car, the purpose of this guide is to help you ask better questions, choose a suitable scope, and know what to inspect before accepting the result. It cannot replace the care instructions for your exact vehicle, finish, upholstery, accessory, or cleaning product.

    When people search for remove smoke smell from car, they often want a single number or shortcut. The responsible answer is a repeatable process: identify the surface and condition, control the work area, use compatible tools and chemistry, remove residue, allow required drying or curing, and inspect again. That process protects the vehicle and gives the customer a clearer handoff.

    What changes the right answer

    The following variables determine whether common remove smoke smell from car advice is appropriate. Review them together for “How to Remove Smoke Smell From a Car Interior”; one factor can change the method even when the rest of the vehicle looks ordinary.

    Cigarette, cigar, cannabis, or fire smoke

    Cigarette, cigar, cannabis, or fire smoke. Treat this as a decision point, not a box to check. Record what you observe, compare it with the vehicle or product instructions, and choose the least aggressive suitable response. That discipline keeps remove smoke smell from car guidance tied to the actual vehicle instead of a generic promise. Interior materials can look similar while reacting very differently to moisture, heat, agitation, and chemistry. Identify the material and test a concealed area before treating the visible stain.

    Duration and intensity of exposure

    Duration and intensity of exposure. Look at this factor before tools or chemicals touch the surface. It changes the labor, the safe method, and the result that can reasonably be approved. If the condition is uncertain, pause for a concealed-area test or a professional inspection rather than increasing force.

    Headliner and carpet absorption

    Headliner and carpet absorption. This detail is easy to overlook, yet it often explains why two similar-looking vehicles need different plans. Confirm it in useful light, keep notes or photos when appropriate, and make the customer or technician aware of any limitation before the work proceeds.

    Ventilation-system contamination

    Ventilation-system contamination. The practical test is whether the chosen method removes the unwanted material without changing the surface underneath. Work in a small controlled area, inspect the towel or tool, and stop when the finish reacts differently than expected.

    Prior fragrance or ozone attempts

    Prior fragrance or ozone attempts. Build enough time for this into the appointment. Rushing tends to move contamination, leave residue, or skip drying and inspection. A clear sequence makes the result easier to verify at customer handoff and easier to maintain afterward.

    Material damage and staining

    Material damage and staining. Consider both the visible surface and what sits below or behind it. Moisture, foam, seams, coatings, electronics, and prior repairs may not be obvious. Material identification is part of good remove smoke smell from car work, not an optional extra.

    Decision factors for remove smoke smell from car
    Use condition and material—not guesswork—to choose the scope.

    A practical step-by-step plan

    This sequence keeps remove smoke smell from car work observable and reversible for as long as possible. Product labels and the vehicle owner’s manual take priority whenever they set a narrower limit.

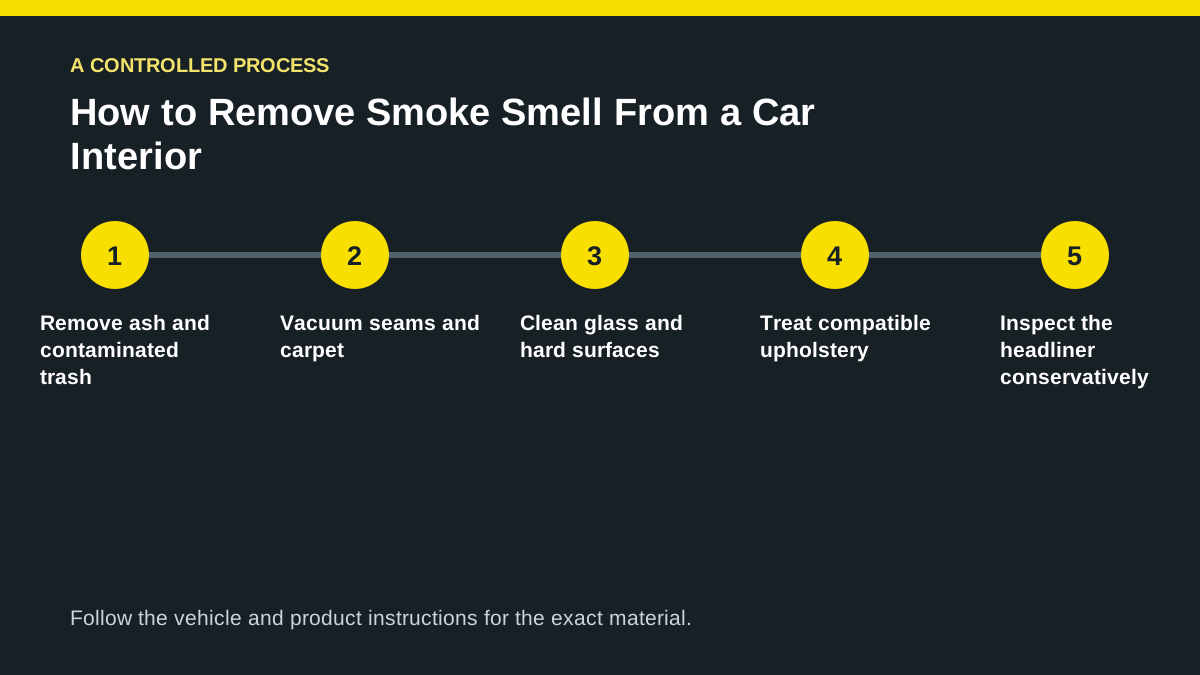
    Step 1: Remove ash and contaminated trash

    Remove ash and contaminated trash. This detail is easy to overlook, yet it often explains why two similar-looking vehicles need different plans. Confirm it in useful light, keep notes or photos when appropriate, and make the customer or technician aware of any limitation before the work proceeds.

    Step 2: Vacuum seams and carpet

    Vacuum seams and carpet. The practical test is whether the chosen method removes the unwanted material without changing the surface underneath. Work in a small controlled area, inspect the towel or tool, and stop when the finish reacts differently than expected.

    Step 3: Clean glass and hard surfaces

    Clean glass and hard surfaces. Build enough time for this into the appointment. Rushing tends to move contamination, leave residue, or skip drying and inspection. A clear sequence makes the result easier to verify at customer handoff and easier to maintain afterward.

    Step 4: Treat compatible upholstery

    Treat compatible upholstery. Consider both the visible surface and what sits below or behind it. Moisture, foam, seams, coatings, electronics, and prior repairs may not be obvious. Material identification is part of good remove smoke smell from car work, not an optional extra.

    Step 5: Inspect the headliner conservatively

    Inspect the headliner conservatively. Use the same standard on every section: inspect, test, perform the minimum effective action, remove residue, then evaluate again. That makes the process repeatable without pretending every panel, seat, lens, or vehicle is identical.

    Step 6: Address cabin filtration and vents

    Address cabin filtration and vents. Treat this as a decision point, not a box to check. Record what you observe, compare it with the vehicle or product instructions, and choose the least aggressive suitable response. That discipline keeps remove smoke smell from car guidance tied to the actual vehicle instead of a generic promise.

    Step 7: Dry, ventilate, and reassess

    Dry, ventilate, and reassess. Look at this factor before tools or chemicals touch the surface. It changes the labor, the safe method, and the result that can reasonably be approved. If the condition is uncertain, pause for a concealed-area test or a professional inspection rather than increasing force.

    Step-by-step process for remove smoke smell from car
    A controlled sequence makes the final inspection more meaningful.

    Timing, cost, and realistic expectations

    Time and price for remove smoke smell from car follow scope. A lightly affected, accessible area may need a short maintenance step; an older vehicle with embedded soil, prior product residue, multiple materials, or damage needs more inspection and labor. A quote should state the selected service, vehicle class, add-ons, and agreed final amount. Duration is useful for planning the detailer’s work and the customer’s handoff, but it should not be used to rush a careful process.

    Some remove smoke smell from car results can be judged immediately, such as loose debris removal or a clean exterior panel. Upholstery, carpet, coatings, and odor work may need drying or cure time before the final condition is clear. Permanent dye change, coating failure, cracks, corrosion, burned paint, worn fabric, and contamination deep inside foam are not the same as removable soil. A reputable service distinguishes improvement from repair and does not guarantee an outcome before inspection.

    For “How to Remove Smoke Smell From a Car Interior,” ask what is included, what is excluded, how a condition-based add-on is approved, and what happens if the technician finds damage or a material that cannot be treated safely. MDC’s booking form displays the configured service prices and selectable extras. Operations confirms the appointment and final scope so the customer and detailer share the same record.

    Orange County conditions to consider

    Heat in a closed Orange County vehicle can make residual odor more noticeable. Ventilation helps after cleaning, but it does not replace physical residue removal.

    Mobile remove smoke smell from car work also depends on the service location. The vehicle needs a safe, lawful, accessible area with permission from the property owner or manager when required. Water, power, shade, traffic, gates, parking rules, and runoff control may affect whether the planned process can be completed there. A good booking request describes those conditions instead of leaving the technician to discover them at arrival.

    Weather can change during a “How to Remove Smoke Smell From a Car Interior” appointment. Hot panels shorten product dwell time, wind moves dust across clean surfaces, coastal humidity slows fabric drying, and unexpected rain can make exterior work unsuitable. Rescheduling or adjusting a scope protects the result; it is not a reason to skip preparation, documentation, or customer approval.

    Common mistakes to avoid

    Most avoidable damage comes from excessive force, incompatible chemistry, cross-contaminated tools, uncontrolled moisture, or a rushed handoff. Watch for these specific errors when planning remove smoke smell from car.

    Using strong fragrance first

    Using strong fragrance first. Build enough time for this into the appointment. Rushing tends to move contamination, leave residue, or skip drying and inspection. A clear sequence makes the result easier to verify at customer handoff and easier to maintain afterward.

    Running ozone in an occupied space

    Running ozone in an occupied space. Consider both the visible surface and what sits below or behind it. Moisture, foam, seams, coatings, electronics, and prior repairs may not be obvious. Material identification is part of good remove smoke smell from car work, not an optional extra.

    Soaking the headliner

    Soaking the headliner. Use the same standard on every section: inspect, test, perform the minimum effective action, remove residue, then evaluate again. That makes the process repeatable without pretending every panel, seat, lens, or vehicle is identical.

    Ignoring the cabin filter

    Ignoring the cabin filter. Treat this as a decision point, not a box to check. Record what you observe, compare it with the vehicle or product instructions, and choose the least aggressive suitable response. That discipline keeps remove smoke smell from car guidance tied to the actual vehicle instead of a generic promise.

    Guaranteeing complete removal from severe exposure

    Guaranteeing complete removal from severe exposure. Look at this factor before tools or chemicals touch the surface. It changes the labor, the safe method, and the result that can reasonably be approved. If the condition is uncertain, pause for a concealed-area test or a professional inspection rather than increasing force.

    When professional help makes sense

    Professional help with remove smoke smell from car is useful when the vehicle has several materials, limited access, embedded contamination, uncertain prior repairs, or a result that needs documented inspection. A technician can also identify when the condition belongs with a body shop, upholstery repairer, glass specialist, electrician, mold remediator, hazardous-spill service, or another qualified trade. Saying that a surface should not be treated is sometimes the safest professional conclusion.

    MDC offers mobile service throughout Orange County for requests such as “How to Remove Smoke Smell From a Car Interior.” Review the Interior Detailing page for the closest service match, browse the Orange County service area, or use the online booking form to choose a vehicle and see currently configured options. The submitted request is reviewed before the appointment is confirmed.

    Frequently asked questions

    Will an air freshener remove smoke odor?

    No. It adds another scent while smoke residue remains on surfaces and in porous materials. For remove smoke smell from car, use that answer as a starting point and verify the actual vehicle, material, and approved service scope.

    Does ozone work?

    Ozone is hazardous to breathe and can affect materials. Any use requires trained controls, an unoccupied vehicle, and complete clearance; it is not the first cleaning step. For remove smoke smell from car, use that answer as a starting point and verify the actual vehicle, material, and approved service scope.

    Why does odor return on hot days?

    Heat can increase release from residues embedded in porous materials and ventilation components. For remove smoke smell from car, use that answer as a starting point and verify the actual vehicle, material, and approved service scope.

    Can every smoke car be restored?

    Severe or long-term contamination may remain in foam, headliner, insulation, and HVAC components despite substantial improvement. For remove smoke smell from car, use that answer as a starting point and verify the actual vehicle, material, and approved service scope.

    Suggested reading

    These related MDC guides explain decisions adjacent to remove smoke smell from car and use the same inspect-first approach:

    Sources and care directions

    Sources for this remove smoke smell from car guide were reviewed September 12, 2026. External material is provided for context; product labels, current manufacturer instructions, and the manual for the exact vehicle control the work.

    Request an interior assessment that targets smoke residue and sets realistic expectations before any deodorizing step.

    For remove smoke smell from car, tell us the vehicle, condition, service location, and result you want. We will review the request, confirm the scope and agreed final price, and send appointment updates as the job moves forward.